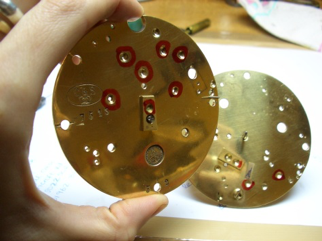
I recently came across some servicing diaries from my early days as an apprentice which I thought I would share on here as they give a good overall picture of the process involved in a mechanical overhaul, the service we offer from our antique clock repair workshop in Andover, Hampshire. When your antique clock leaves our workshop following an overhaul, it will have a 2-year mechanical guarantee.
Once the movement has been removed from the case it is fully dismantled and notes are made of any repairs considered necessary that are noticed during this process.
The larger pivots are burnished on the lathe and any smaller more delicate pivots are done by hand using an extended-handle pin chuck. These pivots have suffered significant corrosion on the acting surfaces and small pits are visible to the naked eye.
The movement has an initial clean in the ultrasonic tank in order to remove any old oil and dirt. This also enables me to see which pivot holes need bushing. After 5 minutes the movement is removed, rinsed and dried using a hair-dryer.
Sadly this clock is in very poor condition and a lot of the pivot holes have worn into an oval shape. I mark 11 holes on the plates that I think need bushing and, as it is quite an excessive amount, check with my colleagues to ensure they are all necessary. Both agree that, given the surprisingly bad condition of the clock, the repair work needs to be carried out to avoid further wear.
The holes are widened using a cutting broach, turning the plates 90 degrees regularly to ensure the broach is cutting in a straight line. A tool is used to remove the burr from the edge of the freshly-cut hole before the bust is inserted.
The bush is driven in from the inside and the slightly proud edge is removed using a fine grade file and sellotape to protect the rest of the plate. The other side of the bush is filed down and an oil sink cutter that matches the existing depth is used to create the sink and make the repair flush and tidy.
The bush is cut using broaches to the correct size. All the pivot holes are then tested by replacing two adjacent wheels at a time and running them alongside each other. When all the pivot holes have been tested and are working correctly the whole train is replaced between the plates to ensure all the wheels are running with the correct depthing.
Now that all the repair work has been carried out I have decided to re-blue the screws as the surface has been slightly worn. I start by using some fine-grade emery paper to remove the oxidised layer and a buff to shine the surface. The slots are also tidied using a piercing saw.
A small blow-torch is needed for this process and some well-worn tweezers are used to hold the screws in front of the flame. When each screw reaches the desired colour it is placed quickly on a steel block to allow it to cool down.
Once all the screws have been blued the entire movement is placed in the ultrasonic tank once again for a full clean.
The plates, barrels and wheels are polished by hand with a soft chalk brush and gloves are worn to ensure no fingerprints are left on the clean movement which could cause corrosion.
All the pivot holes are pegged out to remove any cleaning products or dirt that may have accumulated. This is done using toothpicks which are turned in each hole until there is no residue on the wood.
Next the movement is fully assembled, taking care to ensure that the strike train is properly lined-up so that the warning pin can run without the hammer being lifted until the strike commences and the clock will strike when the minute hand is exactly at the 12 position.
All pivot holes are oiled using a light oil for french movements. The escapement pallets are also oiled to minimise wear until the next time that clock is serviced.
When the movement is back together the pendulum is replaced and it is placed on a test stand. An amplifier is used to ensure it is in beat. The minute hand is moved through a full 12 hours to check the clock is striking correctly.
Finally the clock is left in the test room for a minimum of 3 weeks to ensure it is running correctly and keeping accurate time.


